So, you find yourself as a gamemaster looking to try this new toy, Foundry Virtual Tabletop, which your friends keep saying is the best option for a VTT, since you only have pay for it once instead of promising your future newborn child to a company. However, after opening it you feel that you need to work in IT just to get it working.
Well, fear not, the basics of setting up and running your games on Foundry are much simpler than the splash page would first suggest.
In basic terms, here is what you need to get started:
- Choose a Game System
- Add-on Modules (Optional)
- Create Game World
- Add Players to Game
- Create Player Character Sheets
- Create Scenes
- Add Players to Game
- Send Invites at Game Time
This guide will go over these, and walk you through the full process in a simple way, without overloading you with the information you do not need. After that, a separate section will be your tour guide through the basics of the rest of the important features in the interface, should you find that helpful.
Step 1: Choose a Game System
Foundry won’t come with anything preloaded, so you need to head to Setup page, then pick “Game Systems”, then “Install System”.

There are many systems available to choose from, and these act as the underlying skeleton of your game. Volunteers often regularly update and make these systems available. Unfortunately, some games are not available if no one has programmed them for the Foundry game system.
You can check what is available on the Foundry’s Systems, Modules, and Worlds page.
Step 2: Add-on Modules (Optional)
Next, you can head to the “Add-on Modules” section.
Modules allow you to do many things that other VTT systems cannot. Modules are also how you redeem purchased content from specific publishers. While you do not need any modules to run a basic theater-of-the-mind game, modules do add in more flair and gameplay improvements as needed.
My personal recommendation for some basic modules would be:
- Dice so Nice
- Dicetray
For advanced users I would recommend:
- Stream View
- Splatter
- Automated Animations

A word of caution, though — modules are often only updated as long as its creator keeps them updated to every major edition of Foundry. Sometimes when a world breaks, it is because a module is outdated and is no longer compatible with the other modules.
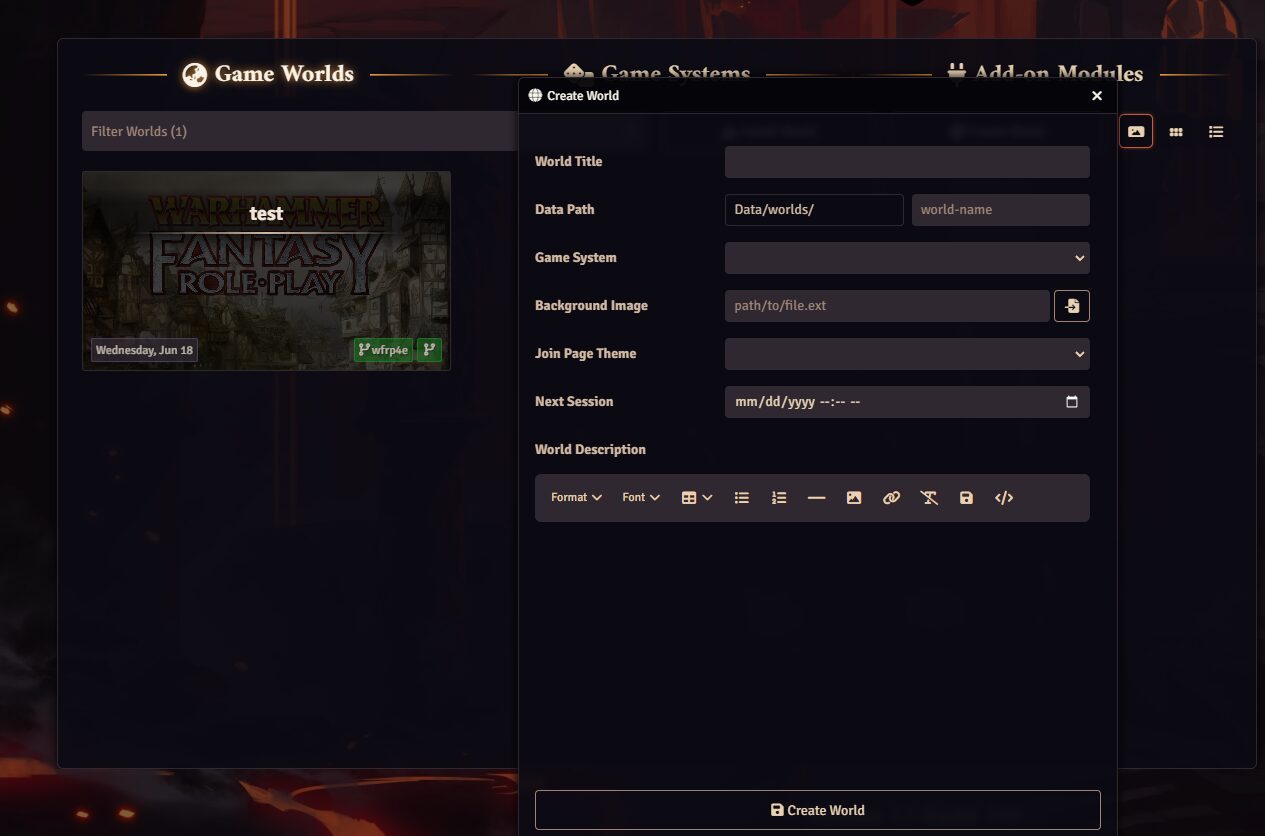
Step 3: Create Game World
Finally, select “Game Worlds”.
Setting up a game world is easy once you have chosen your game system. Simply select “Game Worlds” and create a world. From here, you can pick the title, where your game world will be installed on your PC, and other options.
Step 4: Add Players to Game
In the Game Settings tab under “Game Settings” there is a button called “User Management” that allows you to add your players to the game.

From here, you can create additional users per player and name them accordingly.
There are other advanced options here as well, should you desire to run a co-GM game or even set up a passive observer slot. For our basic needs, all you need to do is add your players as a player and save.

Step 5: Create Player Character Sheets
Every player in your game will be associated with a character sheet and a token. In the Actors tab, you will be able to create an actor that will usually be divided into player characters or non-player characters, depending on your system.
When a player character is created, you can right-click on the new character sheet and “configure ownership” to establish who owns which character.

Step 6: Create Scenes
Creating a scene is where your visual background art or battlemaps are presented to your players. On the top right toolbar the map icon “Scenes” allows you to create scenes for your players. I often use folders to organize between my battlemaps, GM maps, and player maps.

When a scene is made there are many options available for map manipulation. We only need a few of them to establish the basics.
- The first is to provide an image to act as your map in the “Basics” tab.

- The second thing to establish is your grid in the Grid tab above.

Foundry defaults to a square system with a “padding percentage” which represents the grey zone that surrounds your actual map. Grid size determines how large your tokens are universally to each other in relation to the map. I personally use gridless far more often than the other options and I play around with grid sizes until token size seems relatively right for the map.
- Last is the lighting and fog of war system.

Issues with Fog of War/Token Visibility for Players
By default, Foundry is set so that your players cannot see your map unless they have a specifically assigned token for their character on the map. If so, then the fog of war lighting system is in play and if you do not have any sources of light established with the “lighting controls” then your players will be able to see very little.
If you do not want to bother with the lighting and vision system, and you don’t mind if your players can see the entire map, I recommend turning Token Vision and Fog Exploration off.

This way your players should be able to see your entire selected scene unhindered.
Step 7: Create Handouts
Should you require handouts for your game, there is a dedicated section for handouts on the toolbar called the “Journal”. From there, you can add typed information, uploaded images, or even URL links.

During play, when you are ready to show a specific handout to your players, there is an option on the upper right that has a “Show Players” button.

Step 8: Send Invites at Game Time
When it is time to play, invitations can be sent out to your players to have your internet host. In the game settings on the toolbar, select “Invitation Links” under Game Access.

From there, you can copy and paste your internet link for your players to put into a browser of their choice — this option is the equivalent of hosting the game yourself. If your internet is poor, or you wish to have consistent online hosting instead, my personal experience indicates that Google Chrome has the least amount of issues.
The Forge VTT online hosting is considered to be a decent option at the cost of $3.99/ month. However, there is a data cap storage and a fee, which you would not have if you host it yourself directly.
How to Roll Dice in Foundry VTT
Every system in Foundry typically has its own way to roll dice. They are usually associated with a player character’s character sheet and by clicking the skill in question to roll.
If a manual roll is required with no automation, this can be done by typing in the chat box a slash command with the dice type you want. “/r 1d6”, for example.
There is also nothing shameful in using Foundry VTT as a map and token display and handling the rest of the game in Discord: we discuss How to Set Up a TTRPG Discord Server in a dedicated guide.
Interface Overview
You should have everything you need to get started, but you might still feel a bit overwhelmed by the interface. In the next two sections we will cover the Universal Toolbar and the Token Options, for you to know where to find these features and to help you orient yourself a little bit better.
The Universal Toolbar & Its Options
On the upper right of Foundry’s interface are the universal toolbar icons. Every game of Foundry comes with these, and your players will also have access to the majority of these icons. You should familiarize yourself with what each one does helps to provide a smoother game experience.
So, from the top down, these are:
 |
Chat Messages |
This is where your main information pop-ups occur. These often describe combat results or prompts for more advanced systems. You could also run an all-text game this way as well (see Image 1 below). |
 |
Combat Encounters |
In many foundry systems, combat often doesn’t start until a combat encounter is created and activated from this tab. You must also right-click a token and click on the sword and shield icon to add these tokens to the combat encounter system (see Image 2 below). |
 |
Scenes |
As mentioned earlier, all of your created scenes will be lined up here to act as player maps or otherwise. You can activate these scenes for your players to view by right-clicking and selecting “Activate”. You can also view these scenes just for yourself from a GM perspective with “View Scene” (see Image 3 below). |
 |
Actors |
The Actors tab is where you keep your players and non-player characters. |
 |
Items |
The items tab is very important for each individual system, as it can be used for many different things. Often, it is used to organize talents, feats, and actual items that you can drag to character sheets. It is also used as a database for systems that rely heavily on automation with their character sheets. |
 |
Journal |
This is where you place your handouts for players or personal GM notes. These can be typed, images, or even hyperlinks. |
 |
Rollable Tables |
This is a more advanced feature where you can create or import rollable tables. You can associate the potential entries with certain dice numbers, create them as item entries, hyperlinks, pictures, and other devices. |
 |
Card Stacks |
This is another feature where unique drawn Card systems can be made, whether it’s a deck of 52 or otherwise. This works similarly to the Rollable Tables tab. |
 |
Macros |
Macros is another advanced feature where you can use custom coding to create shortcuts. |
 |
Playlists |
Playlists allow you to import music into your game. You can also control the volume using the top interface. In my experience, .OGG sounds tend to have fewer issues than .MP3 formats. |
 |
Compendium Packs |
Whenever you purchase a content module or are trying to import large pre-created content, these are distributed to you in the compendium packs module. If your system does not have an automatic import pop-up, then finding it in the compendium pack and right-clicking allows you to import the content into your Foundry. |
 |
Game Settings |
Game settings control many aspects of Foundry, from player invitation, key bindings, and other UI elements. One of the more important elements under this tab is the “Manage Modules” section, where you can manually turn on and off each individual module addon. “Configure Settings” allows you to set individual module settings and how they interact with your game. |
 |
Collapse |
This is a very simple UI control that lets you minimize or expand the universal toolbar. |
Here are the Chat, Combat Encounters, and Scenes interfaces, for demonstration:


Token Options
Each token comes with several features you can activate, that can feel somewhat obscure. When you right-click a token, several options appear:
- Send to Front: If you are using layers on your map, sending the token to the front allows it to overlay on top of everything else.
- Send to Back: If you are using layers in the back, sending the token to the back allows other things to overlay on top of the token.
- Open Configuration: Configuration gives you access to greater control of the token. You can assign different names and token appearances that can be divorced from the character sheet it’s referring to. This is great when making generic minions, but using a universal sheet for their stats. You can also change their vision, have them emit light for the Fog of War options, and many other things.
- Toggle Visibility State: This allows for tokens to be hidden away from your players’ sight until you reveal them.
- Assign Status Effect: Every token has access to several generic status effects. Sometimes, an individual system will have specially tailored statuses you can apply here as well. Using the defeated status is another method of removing tokens from the combat tracker state.
- Select Movement Action: This is a new feature that determines the token’s travel style.
- Toggle Target State: Some systems rely heavily on the targeted state to work properly for their combat inputs. Selecting the target icon indicates to Foundry that this is the token that you are focusing on. Your players can do a similar thing by double right-clicking or pressing T and then selecting their target token.
- Toggle Combat State: This sends your selected token to the combat state tab for Foundry to track.
There is much more that Foundry VTT is capable of but, hopefully, this gives you enough of the basics to get your basic games running smoothly. Do you have some personal advice for quickly setting things up for the first session? Let us know in the comments below.